The Blue Line Trick
If you’re going through a process of penciling and then inking your work, you might have come across the problem where you miss inking a spot. You mistook your pencil line for an ink line. That’s because all the black lines are blending together. Blue line art can help you with this.
The traditional way of working around this is to pencil in blue or red. This is a throwback. Non-photo reproducible blue pencils were not picked up by the cameras that would create the images to be printed out. You didn’t need to erase them after inking over them as they just wouldn’t show up in the final reproduction. (See more about using colored lines here.)
This is a similar reason to why you might be asked to sign a legal document in black ink instead of blue ink. The blue might not show up on a picture.
The blue pencil continues to the digital world, if partially out of nostalgia.
Here are three ways to mimic the effect of a blue pencil line, from worst to best options:
Change Your Pencil Color
You could just change the opacity of the art on your pencil layer. In so doing, you’ll turn your artwork into a different color (various shades of gray) from the final ink line. For some, this is still bothersome, because the faded pencil lines are hardest to see as they’re inking.
But you can also change the color of the pencil tool you’re using to be a blue or red or any other color that you won’t confuse for the final ink line. If you’re planning on inking in blue for some reason, don’t change your pencil lines to blue, too.
The problem with this is that it’s an extra step every time you pick up the pencil tool. Depending on your tool of choice for changing colors, you might also have an issue with picking a consistent blue color every time.
That doesn’t matter for the final product — unless your Mike Kunkel c.2001 doing “Herobear and the Kid” — but it might be distracting to you if you’re particularly picky.
Use a Special Pen/Brush
There are blue line pencils you can download from the web, or you can create your own brush, of course. You can assign a specific blue color to it and not let the user overrule it.
Frenden offers a Pencils/Dry Brush set for $5.99 that includes both a red and blue layout pencil.
There’s also a free blue and red pencil set listed in “30 Sets of Free Brushes You Can Download Now.”
Use Blue Line Layer (*Recommended)
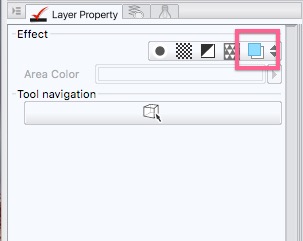
This is the simplest solution, and the recommended one. Clip Studio Paint has a tool built in to deal with blue line layers. Choose the layer you want to turn into blue line art and go to the Layer Property tab, which should be (by default) in the window just above the layers window.
Check the blue square to turn all your imagery on that layer blue:
Or, choose the down arrow next to it to see all your options. Click the Layer Color option to turn the lifework blue.
You don’t need to stick with that blue. If you don’t want to be a traditionalist, you can change it to any color in the Layer Color dropdown. The layer color will affect your black lines. The Sub color will change the color of your white lines.
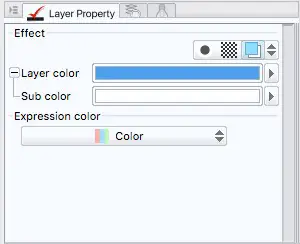
In this case, the black lines will start in a shade of blue. Gray lines will be a less bold version of that blue the same way gray is a duller black.
The white lines, in this case, will remain white.
The great thing here is that the change is persistent for this layer. No matter what too you’re using on this layer, it’ll come out blue. If you like to switch between pencil types to create your art, you don’t have to reset the color each time and you’ll always see blue.
You can, of course, also still adjust the opacity slider to soften the line if you feel like you’re fighting against it it in the ink stage. That’s what I do. It helps to fade that blue out to make your black lines stand out more and easier to understand.
But now, with as little as one click, you can approximate the age old art of drawing in blue line. After that, add a new layer on top and start your inking.