
Eight Ways to Zoom in Clip Studio Paint
There are, as it turns out, at least eight different ways I’ve found to zoom into or out of your image.
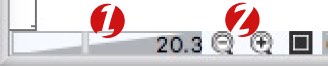
1. The Slider at the bottom of the main window.
This might just be the most obvious, because it’s always there on your screen. Look towards the bottom left corner of the window your image is in. That rectangle that’s cut in half diagonally will zoom your image in and out as you slide back and forth.
2. The Magnifying Glasses Next to That Slider
You can tap or click on those two glasses to zoom in and out a prescribed distance. (12.5% / 25% / 33% / 50% / 66% / 100% )
Bonus: That square next to them will put you at 100% view, pixel for pixel.
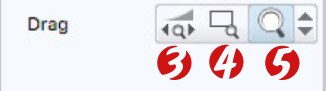
3. The Zoom Tool – Slide
The Zoom Tool can be accessed with the forward slash (“/”) shortcut, or by hitting the magnifying glass icon along the side of the screen. By default, I believe it’s at the top of your screen.
It has three different settings, which we’ll be covering here. The first is the standard slide to the left and right to zoom in and out.
4. The Zoom Tool – Draw a Rectangle
This one is handy when you want to fill the whole screen with a known particular area. Draw a rectangle around that area and it will fill the screen, no matter what zoom level it takes.
5. The Zoom Tool – Click to Zoom
With this one, you can just click on the screen to zoom in or Option-Click (on a Mac) to zoom out. It follows a sequence of zoom levels like the magnifying glasses along the bottom of the window mentioned before.
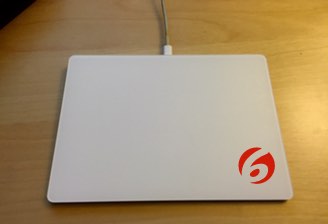
6. The Trackpad
A two finger swipe up on an Apple Magic Trackpad will zoom out. A two finger swipe down will zoom in. It doesn’t matter what tool you currently are using.
7. Generic Keyboard Shortcuts
CTRL +/- will make things bigger and smaller for you. It works in your web browser, so it’ll work in Clip Studio Paint!
8. Your Digital Pen Tablet Special Keys
I included the magic trackpad shortcut, so this hardware is fair game, too.
Cintiqs have the touch rings that can zoom things in and out as you slide your finger around it. Nowadays, most of the higher end XP-Pen and Huion devices have shortcut keys, slides, and rings on them, too. Even the humble Yiynova I use has a remote with programmable keys that can zoom in and out for you.
Did I Miss One?
Let me know in the comments below! I’m curious if this could get crazier yet…
Special thanks to the commenters below who are directly responsible for items 7 and 8.
In the meantime here’s a video with the first six ways:

The quick-keys of course! CTRL +/-, or OPTION +/-
Ack! How could I forget those! Thanks — I’ll have to add those onto the list!
I used to have them on custom keys (1/2) because control and +/- was hard on a small bluetooth tablet keyboard.
New tablet lets me zoom in/out with two fingers. My big wacom cintiq lets me use its ‘touchring’.
Good point – forgot about the touchring with the Cintiqs. My Yiynova has a remote thing with a circle control on it I could probably use for zooming, too, but I’ve never used that remote at all. I should try that someday…
On Windows, I use space+ctrl+mouse1-drag. It’s the quickest key combination if you use the keyboard for panning (space+mouse1-drag) a lot.
Similarly I use:
space+shift to rotate
ctrl+alt to change brush size
And so on. Most of them can be found under File > Modifier key settings. Plus, you can add your own~
Ah, lastly, on touch-capable screen, pinching to zoom (and slide to pan or twist to rotate) will also work.
Does anyone know if there’s a way to change the settings to that swiping with two fingers scrolls instead of zooming and so that I can pinch to zoom as in most other imaging programs? This is really messing with me, haha.
My zoom in and out slide bar is gooooneeeeee, where to pop them back up???
I’d like to have 75% as a prescribed distance. Often while inking I found 66% too far and 100% too close. There is a way to type the zoom you want?